


360° Situational Preparedness Survival Skills
How to Build a 3 drum rain collection system


STEP 1
First of all I cut my cradles that will be used to support the barrels. i simply traced the outline of the drum and cut from there. I cut ten of these. With this design i should (and that a very strong word) should be able to stack three for my system.
STEP 2
I used 2x4's for the legs. Now you might think this may be a bit flimsy for supporting 3 filled 55 gallon drums (approx 500lbs each.) but the cradle pieces between the drums are part of the support themselves. The 2 x 4's are basically there to hold the system together. (of course....I'll test it to just to make sure)
step 3
Assembling the system and installing the drums. the plywood on the sides is for bracing, eliminating any sway from front to back. The cradles will brace any side to side sway.
I will also test the system to ensure that the cradle system & 2x4's will handle the weight.
STEP 4
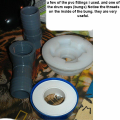
Pretty much adding the plumbing to the drums. My drums had threaded bungs on both sides which made this design possible.
I found these nifty little gray 3/4" NPT angle fittings that connect the drums at Highs (lowes). They do the trick nicely and only cost about $0.89 each. (much cheaper than brass hose fittings)
STEP 5
Testing the system. I filled the water on the top drum and it vented nicely down to the next two drums. the video shows one of the connector tubes as the water traveled down and the venting process occurred at the same time. performed rather well, i think!
STEP 6
Finished system. The drums as well as the 2x4's supported the weight nicely. I can now drain it & disassemble it so i can treat the 2x4's as well as paint it.
I will add the inlet from the gutters later, but it will simply pipe my gutter to the upper hole on the top drum...(see...still no cutting of the drums!!)
Here are some of the changes I made to the design:
1) simpler design and easier to build.(approx. a 12 pk. job) A horizontal "stacked" system takes up much less space than placing them side by side vertically. Great if you don't have much room to spare. (go up rather than out!)
2) I removed the tilt of the barrels. Unless you cut/drill vent holes in each of the barrels, they will only fill to about 75%. I want to utilize the maximum amount of storage from these three drums. Being level, they should fill to about 95%, plus if I decide to dismantle the system and use the barrels for something else, I have that option since I haven't rendered them useless by cutting or drilling holes in them.
3) I changed the installation to a much less permanent one. Instead of digging holes and cementing it in, I will mount the system on concrete blocks (think i pd. $2.59 each for them).
in case i need to move the system or use the drums for another purpose.
4) I implemented the "cradle" design which makes the drums part of the supporting structure. This way I do not have to use 4x4's to bear the weight of three full drums. The 2x4 legs are basically there to hold the whole thing together and for bracing.
5) rather than use expensive (and hard to cut) 4x4's....I used 2x4's. It is still as strong as a 4x4. Its just the reinforcement that matters.
6) kept metal out of the system completely. (which doesn't matter if used for rainwater anyways)(comes in handy if i need to convert this to my SHTF fresh water supply. (yep...I’m somewhat of a doomsday prepper)
With the horizontal mount you don't have to worry about cutting unneeded extra holes in your barrels therefore destroying them. The top drum vents the entire system via the hose connections (see video) as well as making the whole thing essentially one tank.
Once again, this doesn't involve any cutting of the barrels that basically render it useless if you decide to dismantle it & use them for something else down the road.